 Recently i have shared post related to why to use or buy custom domain for blogger blog. Now we have a reason as well as willingness to use custom domain for blogger blog. I have found that many readers are confusing about how to remove “.blogspot.in” or “.blogspot.com” from URL of a blogger blog, For this purpose you have to spend some money the same .
You are required to purchase custom domain form any domain provider, As i am using BigRock Domain i have inserted screenshot it itself. This post is also useful for those who already purchased or want to purchase form other service provider because almost proceeds are same.
How to Setup Blogger Custom Domain with BigRock?
Here now i assumed that you have already purchased custom domain, So congratulations for the same and lets move farther.
Step 1 : Login in to BigRock Account.And select your domain.
Step 2: Now Find “Manage DNS” button.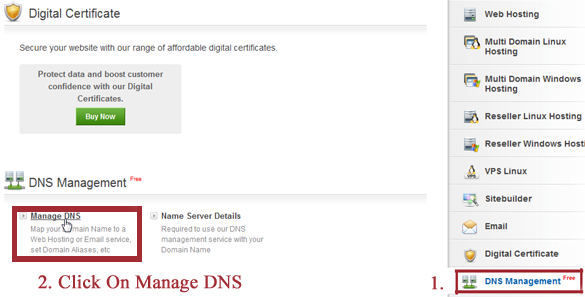
Step 3: Now one popup window will appear, In which click on “A Records” tab. And Click on “Add A Record Button“

Step 4: Now leave name field as a blank and in IPV4 address field insert following code.
216.239.32.21
After it click on “Add Record” button.

Step 5: Now add following three records As the same way.
216.239.34.21
216.239.36.21
216.239.38.21

Step 6: Now Click on “CNAME Records” tab and than click on “Add CNAME Record” Button.

Step 7: In Name field write “www” and in value ( 2nd Option) insert following URL.
ghs.google.com
Click on “Add CNAME” Record.

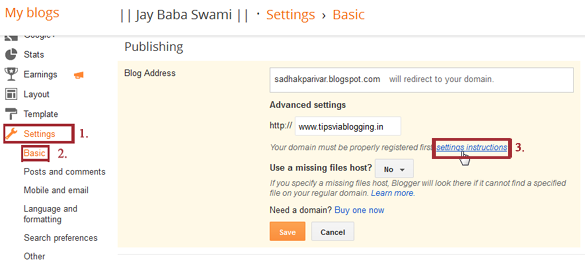
Step 8: Now you are required to add another CNAME Record, for that you are need to Login into your blogger account, Go to Setting > Basic button , Find Blog Address field Click On Add Custom Domain > Switch to advanced settings > Settings Instructions Link.
Step 9: Now you will find two option in which you have to select first one. and copy CNAME Record Name and Value and copy and paste is respectively in next step.

Step 10: Now again go to your “CNAME Records” Tab, In Name field insert copied Name for CNAME Record No.2, And in value field insert Copied CNAME Record No.2 (In 2nd Option ).
and click on “Add new Record” button.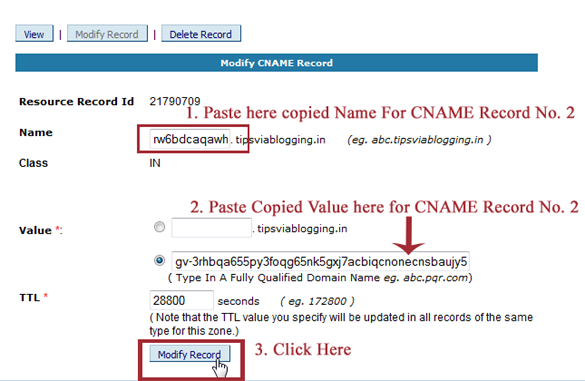
Step 11: Now again you need to Go to Setting > Basic button , Find Blog Address field Click On Add Custom Domain > Switch to advanced settings > Insert your custom URL in field ( as per screenshot ) and click on “Save” button.

That set! It will take 2 hours more for this process from here, See your blog with custom domain after 2 hours and cheer. 🙂


wow thank buddy
If some one wishes to be updated with latest technologies therefore he
must be pay a visit this web site and be up to date daily.
Thanks for your recommendation toward tvb blog, stay tuned ^-^
I constantly emailed this weblog post page to all my friends, since if like to read it afterward my friends will too.
custom domain name draw a professional picture of blog among readers. To buy a custom domain name is very easy but to apply in right direction needs assistance of experts. This tutorial provides that assistance to those who are finding difficulty in their way. Thanks for sharing this.
Great article. It is fully descriptive and informative.
That is a really good tip especially to those new to the blogosphere.
Short but very preciise information… Thank you for sharing this one.
A must read post!
It’s really a great and useful piece of information. I’m satisfied that you just shared this
helpful info with us. Please keep us up to date like this.
Thanks for sharing.
Glad to know this is helpful to you .